What's The New In Microsoft Dot net Frame Work 4.0
In .Net Frame Work 4.0 Mainly Enhancements Occured In WWF, WCF and WPF
Next versions of Windows Communication Foundation (WCF) and Windows Workflow Foundation (WF) will provide better support for Web 2.0 technologies like REST, POX, ATOM.
· Performance and Scalability of WCF and WF are expected to increase by minimum 10X.
· New workflow models.
· Seamless integration between WCF and WF including a new Visual Designer.
· Parallel Programming framework using PLINQ, Task Parallel Library and Coordination Data Structures to better utilize power of multi-processor and multi-core machines.
· Build declarative applications with WF, WCF and WPF using XAML. So, XAML is no more only for WPF and WF.
· WCF enhancements :
o RESTful enhancements
§ Simplifying the building of REST Singleton & Collection Services, ATOM Feed and Publishing Protocol Services, and HTTP Plain XML Services using WCF
§ WCF REST Starter Kit to be released on Codeplex to get early feedback
o Messaging enhancements
§ Transports - UDP, MQ, Local in-process
§ Protocols - SOAP over UDP, WS-Discovery, WS-BusinessActivity, WS-I BP 1.2
§ Duplex durable messaging
o Correlation enhancements
§ Content and context driven, One-way support
o Declarative Workflow Services
§ Seamless integration between WF and WCF and unified XAML model
§ Build entire application in XAML, from presentation to data to services to workflow
· WF enhancements :
o Significant improvements in performance and scalability
§ Ten-fold improvement in performance
o New workflow flow-control models and pre-built activities
§ Flowcharts, rules
§ Expanded built-in activities – PowerShell, database, messaging, etc.
o Enhancements in workflow modeling
§ Persistence control, transaction flow, compensation support, data binding and scoping
§ Rules composable and seamlessly integrated with workflow engine
o Updated visual designer
§ Easier to use by end-users
§ Easier to rehost by ISVs
§ Ability to debug XAML
· First CTP to be released during PDC in Oct 2008.
· Information on this page will be updated as and when it is available.
Friday, September 11, 2009
Sunday, July 19, 2009
Retrieving data from Sp List to Infopath using K2 SmartObjects.
Please consider the following steps.
1) Creation of ‘Employee’ smartobject using K2designer for VisualStudio.
fig1 :
1)2) Creting the ‘Employee ID’, ‘Employee Name’ properties for SmartObject.
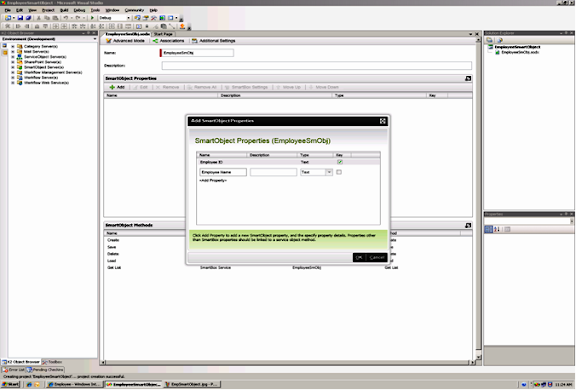.png)
3) Adding ‘GetList method’ to smartobject.
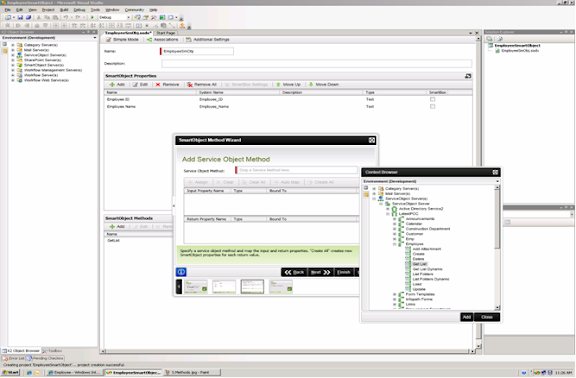.png)
1) 4) Employee SmartObject deployment after addning the GetList method.
.png)
1) 5) Creating the Infopath form template to populate ‘Employee ID’ and ‘Employee Name’ details from ‘Employee SPList’ using the created ‘Employee SmartObject’.

6) 6)Integration of Employee SmartObject with ‘Employee Details Infopath form Template’.
v

6
1) 7) Adding the ‘Employee SmartObject’ GetList method as the Datasource to ‘Employee Details’ Infopath form Template.
.png)
1) 8) GetList method is added successfully to Infopath form template.
.png)
1) 9) Integration of ‘Employee SmartObject’ is completd Successfully.
.png)
1) 10) Providing the SmartObject data connection and a ‘Rule’ being taken to populate the data when form template opnes.
.png)
1) 11) Binding the datasource values to the Controls.
.png)
1) 12) But if I publish the form template to a sharepoint document library, the data population is done properly fig A:
fi


Figc.
.png)
fig d:

For this example I’m accesissing the Sharepoint Site and Sharepoint List created in Server’s Image and I’m accessing the same to Client image.
On Client Image I have
1) K2Designer for VisualStudio (Used to create SmartObject).
2) MS Office Infopath 2007.
I’m able to run and get the data on the server image. But I’m unable to get the data in distributed environment. How to achieve this.
Sunday, July 12, 2009
Satyam Dotnet Interview Questions
Hi Friends , One of my Friend Attend the Dotnet Interview With Satyam
1. What is your qualification?
2. How many years of experience you have? In vb.net?
3. Tell about the recent project? What is your role in that module?
4. Which architecture implemented in this project?
5. Explain about the three tier architecture?
6. How the data will be passed to business layer?
7. What is the inheritance? *How to give quick fixes when there is a change involved in 100 web pages developed?
8. *What is the difference between abstract class and interface?
9. When will we use keyword shadows?
10. What are the access specifiers?
11. What is the scope of Shared?
12. *What is the difference between finalize and dispose?
13. What is the use of SCOPE_IDENTITY()? Difference between Ident_current() and SCOPE_IDENTITY()?
14. Write a query to fetch third maximum salary from emp table?
15. What is COALESCE()? Write a query to fetch data in a column values as a string separated by commas(x,y,z) ?
16. What is instead of trigger? How many instead of triggers can be defined on a table? If there are more than one trigger with same event (insert,update or delete exists) Which trigger will fire first?
17. How to use table output of one stored procedure in another stored procedure?
18. How to improve the performance in sql server?
19. How many types of indexes exists? What is the difference between clustered and non clustered index?
20. Up to which normalization, you have implemented in the tables used for the recent project?
21. What is demoralization?
22. What is the design part you have done in your module?
23. Is VB supports object oriented? *What is the difference between object based and object oriented?
24. What is the visual studio version currently using? And frame version?
25. Explain about dot net framework?
26. Explain about CLR?
27. What is managed code?
28. What is an assembly? *How many types of assemblies are there?
29. Explain the use of windows services?
30. What is polymorphism?
Saturday, July 4, 2009
Adding the Rows To Gridview From Footer

Fig1 :
using System;
using System.Collections.Generic;
using System.Linq;
using System.Web;
using System.Web.UI;
using System.Web.UI.WebControls;
using System.Data;
public partial class _Default : System.Web.UI.Page
{
protected void Page_Load(object sender, EventArgs e)
{
if (!Page.IsPostBack)
{
/* This is For Displaying Grid With Headers When Page is load */
string[] cols = new string[] { "hid", "SlNo", "Issues", "Remarks" };
DataTable dt_part = new DataTable();
for (int a = 0; a <>
{
DataColumn dc = new DataColumn(cols[a]);
dt_part.Columns.Add(dc);
}
Session["dt_part"] = dt_part;
dt_part = (DataTable)Session["dt_part"];
if (dt_part.Rows.Count == 0)
{
DataRow dr = dt_part.NewRow();
dr[0] = "";
dr[1] = "";
dr[2] = "";
dr[3] = "";
dt_part.Rows.Add(dr);
grdparticipents.DataSource = dt_part;
grdparticipents.DataBind();
}
else
{
grdparticipents.DataSource = dt_part;
grdparticipents.DataBind();
}
}
}
protected void grdparticipents_RowCommand(object sender, GridViewCommandEventArgs e)
{
if (e.CommandArgument.ToString() == "Add")
{
addrecord();
}
}
public void addrecord()
{
DataTable dtt = (DataTable)Session["dt_part"];
DataRow dr = dtt.NewRow();
dr["SlNo"] = ((TextBox)grdparticipents.FooterRow.FindControl("txtslno")).Text;
dr["Issues"] = ((TextBox)grdparticipents.FooterRow.FindControl("txtissues")).Text;
dr["Remarks"] = ((TextBox)grdparticipents.FooterRow.FindControl("Remarks1")).Text;
dtt.Rows.Add(dr);
if (dtt.Rows.Count >= 2)
{
if (dtt.Rows[0][0].ToString() == "" && dtt.Rows[0][1].ToString() == "" && dtt.Rows[0][2].ToString() == "" && dtt.Rows[0][3].ToString() == "")
{
dtt.Rows[0].Delete();
}
}
grdparticipents.DataSource = dtt;
grdparticipents.DataBind();
}
protected void grdparticipents_RowEditing(object sender, GridViewEditEventArgs e)
{
DataTable dtt = (DataTable)Session["dt_part"];
dtt.Rows[e.NewEditIndex].Delete();
if (dtt.Rows.Count == 0)
{
DataRow dr = dtt.NewRow();
dr[0] = "";
dr[1] = "";
dr[2] = "";
dr[3] = "";
dtt.Rows.Add(dr);
}
grdparticipents.DataSource = dtt;
grdparticipents.DataBind();
}
}

Sunday, June 28, 2009
Creating Custom Work Flow
1.Introduction.One of the greatest innovations in Windows Sharepoint Service v3 and MOSS 2007 is the integration with Windows Workflow Foundation, a core component of the .Net Framework 3.0. To have a general overview of Windows Workflow Foundation, take a look at these interesting articles from David Chappell. Introducing Microsoft Windows Workflow Foundation: An Early Look. Understanding Workflow in Windows Sharepoint Services and the 2007 Microsoft Office System. In this long series of articles, we will provide a step by step approach to building workflows in Sharepoint with both Microsoft Visual Studio and Microsoft Sharepoint designer.
2. Submitting an expense Report: the scenario
The workflow we are going to create step by step is an application that allows users to submit their expense reports; as soon as their expense report will be submitted, a workflow will be activated; this workflow will:
Before starting, make sure you have a team site with the following list: A list named “Expense Reports” with following columns:
A list named “Managers” with the following columns:
(very important , make sure the Manager and Manager Of columns are of type Person or Group with the Show Field option as account )
Fill up the Managers list with the following values: 3.2 Creating the workflow
Before starting Visual Studio 2005, make sure the followings components have been installed:
It’s time to create our first workflow: start Visual Studio 2005 and create a new project : select Sharepoint project type and the Sequential Workflow Library template. Name the project U2U.ExpenseReport:
In the solution Explorer, delete Workflow1.cs, and add a new workflow file:
Select sequential Workflow and name the file ExpenseReportWorkflow.cs:
Double click on ExpenseReportWorkflow.cs to visualize the workflow in the Workflow Designer Take a look at the referenced assemblies in Solution Explorer:
3.2 Setting up the Sharepoint activitiesThe Sharepoint team provides a set of activities and most of them are compiled in the microsoft.sharepoint.WorkflowActions.dll that can be found in the C:\Program Files\Common Files\Microsoft Shared\web server extensions\12\ISAPI folder. Most activities are either activities derived from HandleExternalEventActivity which is a basic Workflow Foundation activity waiting for an Event or CallExternalMethod which is an activity calling a class implementing an interface (this class is called “local service”). The communication between the WorkflowRuntime host (which in our case is Sharepoint) and the workflow follows the usual pattern defined by the Windows Workflow Foundation team:
The interfaces we will have to deal with are defined in the Microsoft.Sharepoint.Workflow namespace of the Microsoft.Sharepoint assembly and are decorated with ExtenalDataExchangeAttribue (see the Windows Services sdk):
For Windows Workflow Foundation aficionados, it’s worth knowing that the WorkflowRuntime class is completely encapsulated and hidden by the Sharepoint framework; therefore we cannot add our own local /runtime services and invoke them from our custom activities as we usually do we host the workflow runtime ourselves. To display the Sharepoint activities in Visual Studio Toolbox, let’s create a new tab: “Sharepoint activities” and drag & drop the Microsoft.sharepoint.WorkflowActions.dll on it (or use the toolbox browse menu, but the first option is faster).
Many others activities are also available in the WorkflowActions assembly but their ToolboxItem attribute is set to false so that they won’t show up in the toolbox but they can be used with Microsoft Sharepoint Designer.
3.3 Finishing, deploying and testing our “hello world” workflowThe first activity in a Sharepoint workflow must be the Microsoft.SharePoint.WorkflowActions.OnWorkflowActivated activity. Drag and drop an OnWorkflowActivated activity into the designer:
Set its CorrelationToken property as follows:
CorrelationToken are extensively used is in Workflow-Sharepoint programming and are an interesting way to logically group activities together; more details about this later… To make sure our workflow will really work, let’s drag and drop a LogToListHistory activity after the onWorkflowActivated1 activity. Set its HistoryOutcome property to “hello from Serge”:
It’s time to deploy our hello world workflow: workflows in Sharepoint must be deployed as features, so we need to provide more details about our current feature in the feature.xml file . Make sure the features code snippet are activated (the snippets are installed on C:\Program Files\Microsoft Visual Studio 8\Xml\1033\Snippets\Windows SharePoint Services Workflow, press CTL K + B to add this folder to the snippets; choose XML as the language). Select the feature.xml file and use the feature snippet to insert the feature code:
Replace the Guid with a new Guid (use the create Guid tool in Visual Studio Tools Menu-Create Guid menu, select registry format, click on “New Guid” Button, click on Copy and paste it in the feature.xml file). Replace the Title and Description attributes with some meaningful information:
Sign the assembly: project properties-Signing- Check sign the assembly, select new, create a new file and rebuild the project. The manifest file of the feature is workflow.xml: replace the existing content with the tags provided by the workflow snippet; set the Id with a generating a new Guid, provide a Name, a Description, and specify the CodeBesideClass. Use Reflector to retrieve your assembly strong name and insert it into the CodeBesideAssembly attribute :
Remove any other tags. The install.bat file will deploy our workflow by registering the assembly to the Gac by will installing and activating our feature to the site collection. We need to specify the site collection in the install.bat file: replace “http://localhost “ string with your site collection url :
In my version of the install.bat, 3 occurrences have been replaced. Next we need to specify our assembly name (that will also be our feature name here): replace the string “MyFeature” with the string “U2U.ExpenseReport”.
In my version of the install.bat file, 13 occurrences have been replaced. Save the file. Start the install.bat and check any potential error message. You can verify your workflow has been activated: Site settings Menu-Galleries-Workflows
Let’s make an association between our ExpenseReports list and the workflow : Select the ExpenseReports list, go the List Settings: in Permission and Management, select Workflow settings:
Select Add a workflow and select the Expense report Workflow ; type a unique name for the association like ApproveReject :
Click on Ok. Go to the ExpenseReports list add a new Expense Report:
Start the workflow menu associated with the item:
Click on the ApproveReject button. Normally a new column the association has been added to the list; if everything is ok, the workflow status for the item is completed:
If you click on the Completed hyperlink, you’ll be redirected to the workflow history and you’ll see our message:
Congratulations ! In the next article we will implement the Submit expense Report scenario.
This hands-on training is the property of Redwood S.L sprl and may not be organized in class or in group without the prior written permission of Serge Luca. Should you wish to organize this hands-on training in your company or institution, please contact Serge Luca first to enter into a licence agreement. Each trainer or teacher using this hands-on training should have a licence agreement. Please ask your trainer or Serge Luca whether he or she has entered into a licence agreement with Redwood S.L sprl. The hyperlink to this hands-on training may be placed on your website for free, on the condition that the name Serge Luca is clearly mentioned in the reference. Please send us a mail containing the link to the web page our reference is used on.
Step by Step Tutorial. Creating Workflows for Windows Sharepoint Services and MOSS2007 (part 1/20).This Article is Refernce fromhttp://sergeluca.spaces.live.com/blog/cns%21E8A06D5F2F585013%21859.entry |


Subscribe to:
Posts
(
Atom
)